How to Can with Frozen Tomatoes

Hi all!

I’m back with another vlog! I wanted to make a vlog about how I can tomatoes. Since I had tomatoes in my freezer that needed to be preserved for easier use I thought it would be a good time for a video!

Enjoy!

Cherry Blossom Hydrosol

Once a year I get the pleasure of looking out my master bedroom doors to my cherry blossom tree.

Literally the largest tree on the block

Not only is it the largest tree on the block but it’s the earliest blooming cherry blossom tree (since my back patio is surrounded by concrete it’s abnormally warm for the area).

I love this tree so much. Not only does it create shade & greenery to my Urban landscape but it gifts me with beautiful pink flowers every year.

This year I did something I always wanted to do: I made a preservative with the cherry blossoms. I went out back & gathered as many cherry blossoms from standing height as possible…& I was pretty proud of myself too! It took all evening!

It took a long time to gather this cute little pile!

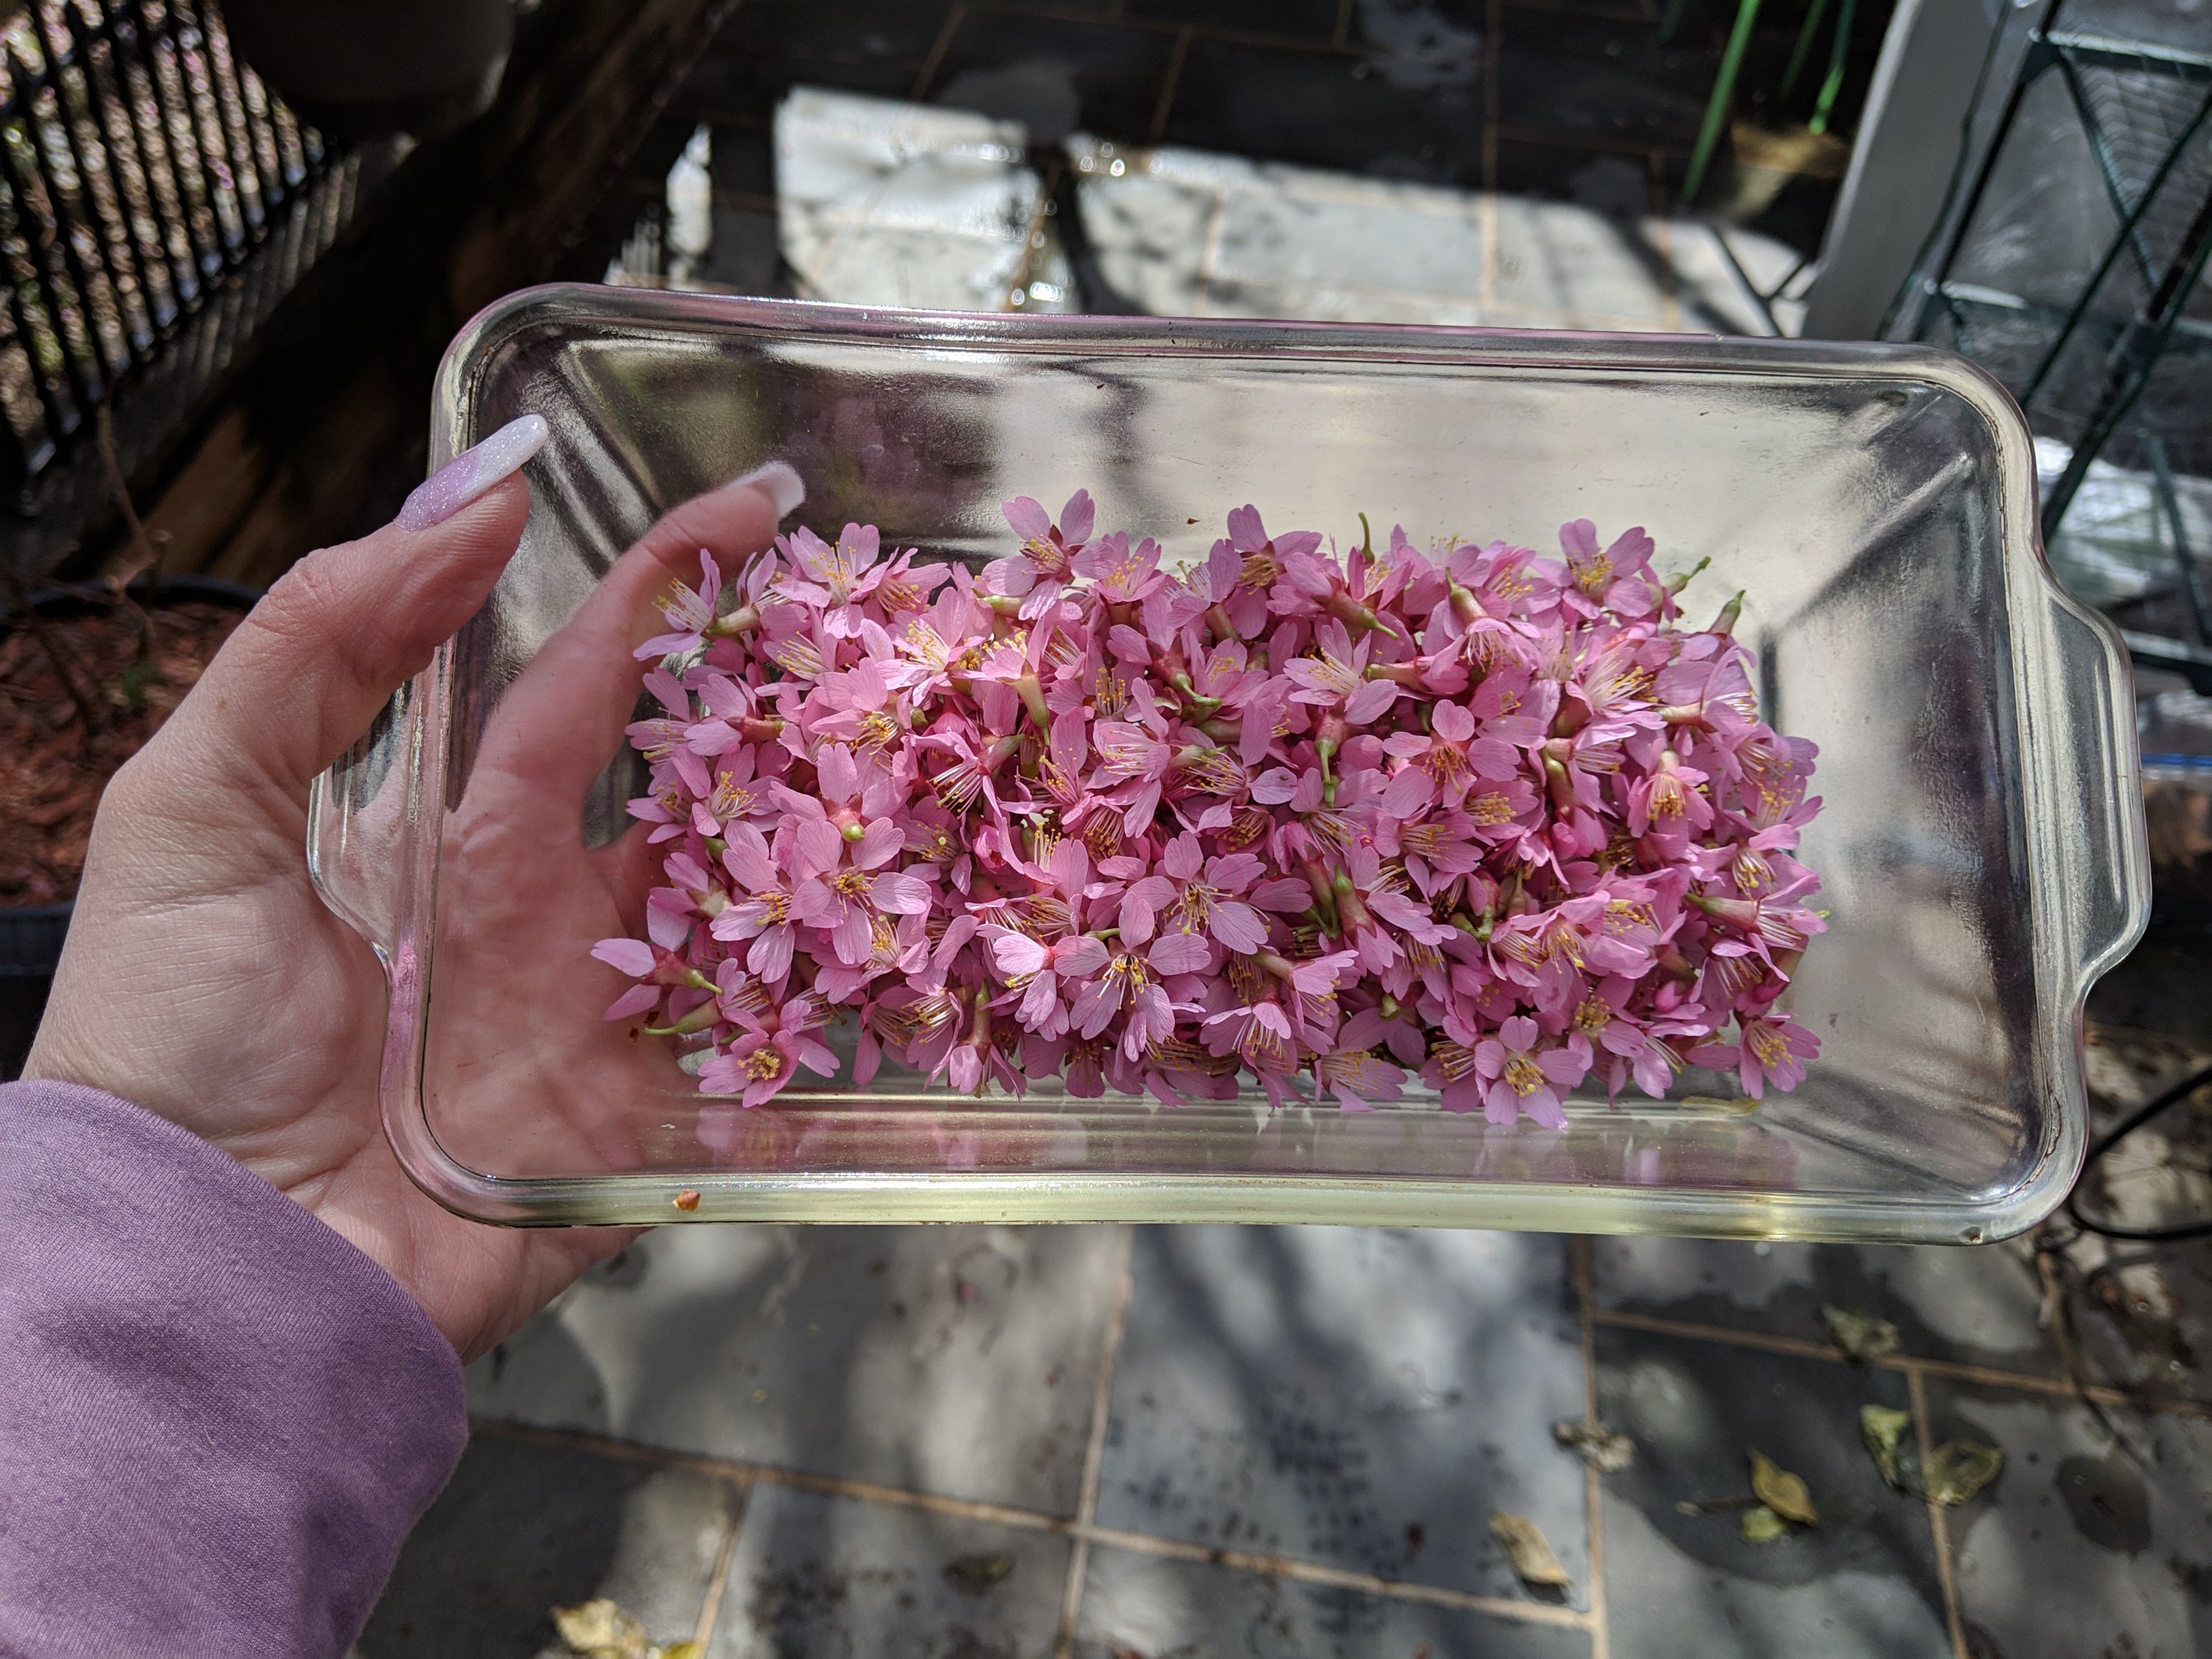
When I asked my herbalism group what I should do with the cherry blossoms the overwhelming majority said I should make a cherry blossom hydrosol…

Well… Sh*t…

Continue reading

Marinated Red Peppers

Sweet Red Bell Peppers were the first vegetable I canned.  When I first canned them, I wasn’t sure what I was going to make with them.  By the time winter came, I made up a recipe with these marinated peppers and sausage that has turned into one of my favorite winter recipes.  Now, I make sure that I have enough cans to last me through the winter.  I will make sure that I can about 7-10 jars.

Before I tell you about the recipe, there are a few important notes I have to inform you of.  As discussed in “Let’s Talk About:  Boiling Water Bath Canning” you can only safely BWB can vegetables if they are pickled or fermented somehow.  Also, it is important to note that you should never can with oil; this marinade has oil in it.  So, how does this recipe become safe to can if canning in oil is a big no-no? 

If you look at the ingredients for the marinade, you will find that it has 2 different acids:  lemon juice and vinegar.  You’ll also notice that the vinegars are not diluted in water.  The original recipe was created and tested safe by The National Center for Home Food Preservation.  Now, even though this canning recipe is safe to BWB and the recipe will be shelf stable, NCHFP recommends that it should only be shelf stable for about 6 months.  The oil in the recipe can go rancid…because of this many experienced canners choose to just leave out the oil and can the peppers with just vinegar and lemon juice.  I understand why they do it because it sucks to lose a jar of food when you’ve put so much work into something.  However, I can this recipe as is.  The reason being that I don’t can for long term shelf storage (2+ years or longer), I can to preserve the flavor of the seasons.  So, I will generally eat the marinated red peppers within 6 months.  I have never had a jar go rancid on me (*knocks on wood*).

Look at these gorgeous peppers!  They were on sale so I grabbed them!
 
You will find different ways to make this recipe online and in books but it is important to note that the method stays the same:  4 pounds peppers, 1 cup lemon juice (bottled, always bottled), 2 cups vinegar, 1 cup oil.
 
 
Mmmmmm, roasted peppers are yummy!
 
Some recipes will have a mix of peppers, some recipes roast the peppers, some do not roast the peppers, some add onions, some add dried herbs, you’ll see white wine vinegar used, cider vinegar used, and some will use vegetable oil instead of olive. However, they all should follow the same method. If you come across a recipe that does not follow the approved method, it probably isn’t a safe recipe.  The recipe I follow, and the recipe that introduced me to this, is from Eugenia Bone’s book Well-Preserved.

They look so pretty in my new blue jars!

Marinated Red Bell Pepper

From Well-Preserved by Eugenia Bone

Yield:  3 pints

4 pounds red bell peppers (8 to 10 medium)
1 cup bottled lemon juice
2 cups white wine vinegar (I use regular white)
1 cup olive oil
2 medium garlic cloves, sliced
1 1/2 teaspoons salt

  1. Roast peppers, turning them often with tongs, until they are black and blistered all over.  Remove from heat and place on a cutting board to cool.  When they are cool enough to handle, remove the skin, stem, and seed pod from the peppers.  Using your hands, tear peppers into large pieces (I go by the natural ribs of the peppers, they should tear easily along those ribs).
  2. Combine lemon juice, vinegar, olive oil, garlic, and salt in a medium sauce pan.  Heat to just boiling.
  3. Working quickly, stuff peppers into hot jars leaving about an inch of head space (the peppers will expand during processing).  Pour marinade over peppers leaving about a half inch headspace.  Ensure that garlic is evenly split amongst jars (I filter them out of the left over marinade).  Using a butter knife, ensure that there are no air pockets or bubbles in the peppers by running it between the jar and the peppers.
  4. Following “Kitchen Tactics:  Boiling Water Bath Canning” , process pints for 15 minutes.

Sauerkraut

 I hate sauerkraut.

The sauerkraut I always knew was the sauerkraut that came out of the can from the grocery store.  The way it smelled, the way it looked, the way it cooked.  I just never understood what everyone loved about it.  I also didn’t understand what it was.  What the heck was it?  I mean, I knew it was cabbage but what the heck made it so limp and awful?

Sauerkraut is fermented cabbage.  You massage cabbage with salt so that the cabbage leaches out it’s own water.  Then you let the cabbage sit in the brine and work it’s magic.  When I started preserving my own food, I kept turning to the sauerkraut recipes.  They looked so easy…but, I hated sauerkraut so I wasn’t sure I wanted to try it.

Finally, I decided to jump in feet first and I’m glad I did.  Turns out I don’t really hate sauerkraut at all.  In fact, I love it!  The stuff I hated was the grocery store canned garbage.  Homemade sauerkraut is completely different.  It’s tangy and crispy with layers of sweet and salty.  It’s wonderful!

Now I can say that I *used* to hate sauerkraut.  Now I can say I love it!  I really do.  I’m a sauerkraut eating machine!

There are several steps in making sauerkraut and it may seem like a lot of work but it really isn’t.  Time does all the work for you.
 
Part 1 – The Fun Part:  Thinly slice the cabbage and place in a large bowl.  Add a couple tablespoons of kosher salt and a tablespoon (or so) of caraway seed.  Now start massaging the salt into the cabbage.  You want to massage the cabbage until it starts to leach out it’s own liquid.  You want to massage it for about 10 minutes, sometimes more.  The easiest thing to do is to get one of your kids, or your neighbors kids to do this, what kid doesn’t like playing with food? 

 
Once the cabbage is finished being massaged, place it in a food grade bucket or in a mason jar.  Fill a plastic bag with salt water and place it on top of the cabbage.  let this sit on your counter for 24 hours.  After 24 hours, check the level of the brine.  The cabbage should have created enough of it’s own brine to be completely submerged.  If not, make a brine solution with water and kosher salt and pour it over the cabbage.  Replace the baggy and let the cabbage sit on your counter.

 
Always place on a plate.  Trust me on this. If your cabbage is really fresh,
you’ll wake up with brine all over your counter if you don’t…
 
Part 2 – Fermenting Time:  It will take the sauerkraut at least 2 weeks to completely ferment.  I usually let mine ferment for about a month before I can it.  At first it will smell very strong and you will wonder what I talked you into.  This is a good thing, this is the bacteria doing it’s fermenting job.  They are busy working away at turning cabbage into sauerkraut.  Once the ferment starts to settle down, that’s when it will start to smell sweet.  At this point it is finished and you can taste the sauerkraut to see if it’s at the flavor that you want. 
 
Part 3 – Storage:  At the point that the sauerkraut is finished, you can put it in the fridge and eat it within a couple months or you can it.  I prefer to can it because it’s more shelf stable to can and I don’t want to take up any more room in my fridge than I have to.

The jar with the ring still on never sealed so that is going in my fridge!


Sauerkraut

Yield:  4 pints

Adapted from Well-Preserved and Canning for a New Generation

Ingredients:
1.5 pounds cabbage (about 1 head)
3 Tablespoons kosher salt (plus more as needed)
1 teaspoon Caraway Seed

Directions:

  1. Core and finely slice the cabbage.  Combine cabbage and 1.5 tablespoons of kosher salt in a deep non-reactive bowl.  Start massaging the cabbage until it starts to leach out it’s juices.
  2. Combine 1 quart water with remaining 1.5 tablespoons kosher salt in a 1 quart resealable plastic bag.  Place the plastic bag over the cabbage to weight the cabbage down below the brine.
  3. Let the cabbage sit for 24 hours.  After 24 hours, check the level of the brine.  If the cabbage is not submerged in brine, make a brine mixture using 1 quart of water and 1.5 tablespoons of salt.  Pour this over the cabbage until it covers the cabbage.  Replace plastic bag filled with brine.
  4. Let the cabbage rest for a minimum of 2 weeks.  After 2 weeks, check that the fermentation is over and that the sauerkraut is at the flavor you desire.
  5. Once the sauerkraut is at the flavor you desire, prepare BWB and 4 pint jars
  6. Boil the sauerkraut for about 10 minutes.
  7. Pack into scalded jars and cover with brine leaving 1/2 inch headspace.
  8. Process for 10 minutes.

Riesling Kumquat Syrup

One of the first things that popped into my mind after I received the kumquats  was syrup.  I wanted to make a fruity, citrusy syrup to add to my bar.  Not only that, I wanted to be able to pour it over pancakes, ice cream, yogurt, basically anything that would benefit from a pop of citrus.  Having tasted the kumquats, aside from their great burst of citrus flavor, I thought of Riesling.  Hence, Riesling Kumquat Syrup was born.


This process is broken down into two days.

 
Day 1:  After washing the kumquts, thinly slice them and put in a medium sized pot.  Add a pint and a half of Riesling and set over high heat.  Once it starts boiling, turn down the heat and gently boil for 15 minutes.  Cover and put in the fridge over night. 

This syrup will be safe to feed to children because all the alcohol will cook out.

Day 2:   Take out of the fridge and put on stove top, set to high and boil for 5 minutes.  Turn off heat and let sit for 1 hour.  In the meantime, set up your BWB.  After an hour, strain the juice over a large bowl.  Make sure to get as much of the flavor out of the pulp as possible.  Keep stirring and pressing until the skins and pulp look “dry”.  Toss the skins and pulp.

 
You should end up with around 2 cups of juice.  I ended up with 1.5 cups.  Add water to the juice to equal 2 cups – you can also add any extra riesling but I drank all the left over riesling the night before! HA!

 
Add juice and 1 cup of sugar to a medium sized pan and set the pan to high heat.  You want to boil the syrup until it reaches about 118 (115-118 is ok) on a candy thermometer.  Ladle into prepared jars and process for 5 minutes.
 
I do like the flavor of this syrup however using the Riesling might be a little too sweet for my palate.  We’ll see how it mellows out over time.  Next time I’m going to try it with Chardonnay since Chardonnay has a more oakey and earthy flavor.  Overall, I’m happy with how this turned out and can’t wait to crack into these jars!  I’m thinking Riesling Kumquat Macaroons are in the future!
 
Riesling Kumquat Syrup
 
Yield:  4-6 quarter pint jars
 
1 Quart Kumquats
1.5 pints Riesling
1 cup sugar
 
Day 1
  1. Slice kumquats and place in a medium sized pot.  Add Riesling and gently boil for 15 minutes
  2. After 15 minutes, cover, and refridgerate overnight
Day 2
  1. Boil kumquats for about 5 minutes and let stand for an hour
  2. Prepare BWB
  3. After an hour has passed, strain kumquats, ensuring that you get all the juices out from the pulp and skins.
  4. Measure the juice and if you don’t have 2 cups, add water (or Riesling) to equal 2 cups.  Pour into medium sized pot and add 1 cup of sugar.  Boil and stir until sugar is dissolved.  Keep boiling until candy thermometer reaches about 118 degrees.
  5. Ladle into hot jars leaving 1/4″ head space and process for 5 minutes


Preserved Kumquats

In “Canning for a New Generation”, Liana Krissoff has a recipe for a drink called the Kumquat Knickerbocker.  I have been pining for this drink since I bought the book and I finally bit the bullet.  Being a fan of kumquats, I decided to go all in and order 5 pounds from Beck Grove.  This recipe is a sweet preserve, preserving the kumquats in sugar.  the method is fairly easy as you keep the kumquats whole, only cutting two small slits in each.  This is my first year preserving kumquats, so it shall be interesting to see how the preserved kumquats come out. and how I decide to incorporate them into my recipes.  My mind is already churning on how to use these little guys and not just for my liquor cabinet!  I’m thinking pork, duck, lamb, chicken, and even venison! 

Preserved Kumquats

From Canning for a New Generation

Yield:  4 half pint jars

1.5 pounds Kumquats
2 cups sugar
3 cups water

  1. Prep work area per “Kitchen Tactics:  Boiling Water Bath Canning”
  2. With a paring knife, cut off the blossom end and slice two slits in each kumquat.  Place them in a saucepan and cover with cold water.  Bring to a boil over high heat, boil for 5 minutes, then drain.  Repeat 2 more times for a total of 3 times.
  3. In a large pot combine 3 cups of water and 2 cups of sugar, bring to a boil, and stir to dissolve the sugar. 
  4. Add the kumquats and return to a boil.  Skim off any foam, lower heat, and simmer until kumquats are translucent and glossy and the syrup is thick and reduced until it just covers the kumquats, about 30 minutes.
  5. Remove from heat, stir to distribute the fruit, and ladle the hot kumquats and syrup into the hot jars, leaving 1/4″ headspace.
  6. Process for 10 minutes. 
Mmmmm, can’t wait to try that drink!

Three Citrus Marmalade

I’ve always been on the fence about marmalade.  Some commercial marmamalades are too tart, some are too bitter, and some are too sweet.  There are hardly any that I could find that I really truely liked.  So, when I recieved Eugenia Bone’s book Well-Preserved, it surprised me that I really wanted to try her Three Citrus Marmalade.  It sounded so good on the page.  Yes, the very first jam I ever made was a marmalade (what can I say?  I’m an overachiever!).  It was hell.  I stayed up until 4 am making it…but you know what?  The next day when I tried some of the excess marmalade with toast, it was amazing.  The.  Best.  Marmalade.  Ever.  Having a mix of three different citrus really balances out the individual strong flavors of all the citrus.  I really want you to make this marmalade.  Really.


The name of the marmalade says it all:  Three Citrus.  You can use any three citrus you want just be sure to use oranges and lemons.  You can use ruby red grapefruit, seville oranges, navel oranges, cara-cara oranges, meyer lemons, ponderosa lemons, etc; as long as you stay with the ratio 1 grapefruit:  3 oranges: 2 lemons  For this batch, I used a pomelo, 3 navel oranges, and 2 lemons.  The easiest way to make this marmalade is in two days.  If you break it down into two days, you won’t be up until the wee hours of the morning finishing the marmalade.

 
On the first day, once you have scrubbed and dried your citrus, you want to peel each citrus in as large of pieces as you can get.  It’s easiest to do this with a paring knife.  A paring knife will allow you to make equal sizes of peel.  You’ll then cut off as much pith from the peel as possible. 
 
 
Once you have the citrus peel cleaned.  You will cut the citrus peel into small matchsticks until you have one cup.  I don’t like the taste of grapefruit peel so I leave it out (I find it too bitter) but I alternate between lemon and orange peel so that I have an equal amount of both.  Some people like all orange, some people like all lemon.  It’s really up to you and what you enjoy.

In a medium pot, add the slivers of rind and cover with 3 cups of water.  Cook over medium heat for about 25 minutes.  Do not drain.


 You will cut the citrus in half across the equator and pop out any seeds.  Using your food processor, blend up the citrus into a pulp.  At this point you want to measure your pulp.  However much pulp you end up with, you will add that much sugar on day 2.  I had 4 cups of pulp. 

Pour this pulp into the pot with the rinds and water.  You will stir this up, cover, and put in the fridge overnight.

On day two, transfer the pulp mixture into a wide heavy pot.  Add the sugar in accordance with how many cups of pulp you ended up with the night before (I added 3 cups, 4 cups is just too sweet for me) and a teaspoon of butter (the butter will help the marmalade from foaming up).   Cook over medium low heat until your candy thermometer reaches 220 degrees.

You will need to prepare at least 4 half pint jars.  I always have extra with this recipe, however, so I always prepare 5-6 half pints.  I ended up with 5 half pints and an 1/8 of a cup that I poured in a ramekin to put in the fridge.  Process using BWB for 10 minutes


Three Citrus Marmalade
 
 
Yield:  4 half pints
 
1 Grapefruit
3 Oranges
2 Lemons
3 cups of sugar
1 teaspoon of butter
 
Day 1
  1. Peel citrus in as big of pieces as possible.  Cut most of the white pith off of the rind.  Cut the rind, alternating between citrus peel, into little match stick until you have 1 cup.  Pour rind into a medium pot, cover the rind with 3 cups of water and cook at medium high heat for 25 minutes.  Do  not drain.
  2. Cut the citrus in half across the equator, pop out the seeds, and grind in your food processor until you have a thick consistent pulp.
  3. Measure the pulp and take a mental note of how many cups you had.
  4. Pour the pulp into the pot with the citrus rinds, cover, and put in fridge to rest overnight
Day 2
 
  1. Prepare 6 half pint jars per “Kitchen Tactics:  Boiling Water Bath Canning”
  2. Pour pulp mixture into large, wide pot.  Add 1 cup of sugar to 1 cup of pulp.
  3. Add 1 teaspoon of butter
  4. Cook over medium low heat until candy thermometer reaches 220.
  5. Pour into prepared half pint jars, leaving 1/4 inch head space.
  6. Process for 10 minutes


Grapefruit in Minty Syrup

My friends at Pearson Ranch California Oranges helped me out again.  Right now they have a combo citrus pack with 10 pounds Oros Blancos and 8 pounds Pomelos.

The other “grapefruit” are Pomelos

Oros Blancos are the smaller grapefruit.  They are a very light yellow and their fruit is a golden color.  They are much sweeter and not as tart nor as sour as Ruby Red or Pink Grapefruit.  They are a lovely mild grapefruit that is sweet at the front on your tongue but mildly tart once it hits the back.  These would be a great grapefruit for those of you that do not enjoy the brash tartness of the Ruby Reds.

I wanted to can enough to last me a year or more, so I ended up canning all ten pounds of Oros Blancos in heavy mint syrup.

First you want to fill your canning pot with water and add the specific number of 1/2 pint jars to the pot (I needed 8).  You will need to sterilize the jars first because these segments will only be in the BWB for 5 minutes.

While your canning pot is coming to a boil, you will want to wash and scrub your grapefruit.  Remember the post I did about segmenting citrus?  Well, we are going to do that.  To all 10 pounds (yes, you can start cursing at me now.  Ok, ok, I won’t make you do 10 pounds, I’ll just make you do 5).

Once you segment all the fruit, you’ll have a bowl full of lovely grapefruit segments!

Try not to eat them all before you can them!

Next you are going to make your heavy minty syrup (the syrup you make for this doesn’t have to be heavy.  That’s the beauty of canning yourself, you can make the syrup however you want).  The original recipe called for fresh mint but since it’s winter, I used dried mint; 2 tablespoons in a cheesecloth spice bag.  Holding the fruit back, tip the bowl over into a 4 cup measuring cup to pour out all the grapefruit juice.  Fill the water until you have 4 cups of liquid.  Pour this grapefruit juice/water mixture into a medium saucepan and add 2 cups of sugar to your mint.  Bring the syrup to a boil, cover, and simmer until you get the minty taste you want; I simmered it for about 20-25 minutes.  If your jars have not sterilized by this time, take the mint spice bag out of the syrup and toss it, then keep the syrup simmering until you are ready to can.

Now that your jars are sterilized, place your 1/2 pint jars on a placemat or towel.  Working quickly fill the hot jars with your grapefruit segments leaving about a 1/2 inch head space.  Then ladle your simmering syrup into the jars up to about 1/4 inch head space.

As you can see, I ended up with a yield of (7) 1/2 pints of grapefruit and (1) 1/2 pint of minty syrup and then some extra that I’m not canning.  I will can the 1/2 pint and place it in my liquor cabinet.  There are plenty of drinks we can make with the minty syrup!  Stay tuned!

Run a chopstick around the fruit to release air bubbles, wipe the rims with a damp paper towel, top with lid and ring, and place in your BWB.  Once the pot starts to boil, start your time for 5 minutes.  After the 5 minutes are up, turn off the heat, and let the jars sit in the pot for 5 minutes.  Place on a place mat or towel on your counter.  After an hour check the seals, if they have not sealed, place in the fridge and eat within the next two weeks.  If they have successfully sealed, let them sit undisturbed overnight.  Take off ring, wipe down with a damp towl, label, and place in a dark cabinet until ready to eat.

DO NOT THROW OUT THE EXTRA MINT SYRUP THAT WASN’T CANNED!!!  Bottle it and put it in the fridge!  We will revisit the mint syrup later!

Grapefruit in Minty Syrup

Adapted from Canning for a New Generation by Liana Krissoff

Yield:  4 half pints

5 Pounds grapefruit
1 Cup sugar
2 Tablespoons dried mint placed in cheesecloth spice bag

  1. Sterilize your jars and keep them hot in the canning pot.  Follow BWB canning procedure as per “Kitchen Tactics:  Boiling Water Bath Canning”
  2. Segment your grapefruit per “Kitchen Tactics:  Segmenting Citrus”
  3. Holding your grapefruit segments back, pour the collected juice into a 2 cup measuring cup.
  4. Add enough water to make 2 cups liquid.
  5. Pour into a medium saucepan and add 1 cup sugar and mint spice bag.
  6. Bring to a boil, stirring until sugar is dissolved.  Lower heat and simmer until you get the minty flavor you desire.  Fish out the spice bag.
  7. Working quickly, fill sterilized jars with grapefruit segments leaving 1/2 inch head space
  8. Ladle the boiling syrup over the segments leaving a 1/4 inch head space.
  9. Use a chopstick to remove air bubbles, wipe rim with a damp towel, put the lid and ring on the jar, and place jar in your canning pot.  Ensure that you have at least 1 inch of water covering the jars.
  10. Process for 5 minutes.  Shut off heat and let the jar sit in the hot water for 5 minutes.
  11. Check seals after one hour; if they have sealed, place in fridge immediately.  Label sealed jars and store.

Canned Lemonade Concentrate

Folks, I pulled out the big gun:


The dehydrator holds all the citrus peel!

The love of my life, my Kitchen Aide Stand Mixer and her attachment, the citrus juicer.  I love lemonade and last year I made a limited number of canned lemonade concentrate.  I did not make enough and I ran out halfway through the year.  Booooooo.  This year, I was determined to make enough lemonade concentrate to last the whole year.

So, we had the 15 zested lemons from the limoncello and the 15 zested lemons from the dried peel, cut those lemons in half and juice them.  Then cut in half and juice more lemons to equal 9 cups of lemon juice (DO NOT THROW AWAY THE PEEL!  WE ARE GOING TO MAKE SOMETHING WITH THEM!).

Mmmmmm, Lemonade…

Canned Lemonade Concentrate

Yield:  8 pints

Ingredients
9 cups of fresh Lemon Juice
5 cups of water
4 cups of sugar

  1. Prepare jars, lids/rings, and canning equipment per “Kitchen Tactics: Boiling Water Bath Canning”
  2. Place lemon juice in a large stock pot.  Add 5 cups of water and 4 cups of sugar.  Bring to a low boil then turn down the heat and simmer.
  3. Ladle the hot concentrate into 8 hot pints leaving 1/4″ headspace.
  4. Process via BWB for 15 minutes.
  5. To make lemonade, dilute one pint of lemonade concentrate with however many pints of water to suit your taste.

Kitchen Tactics: Boiling Water Bath Canning

Yesterday in the “Let’s Talk About” series, “Let’s Talk About:  Boiling Water Bath Canning”, we discussed the reasons why BWB canning works.  In order to not make either post huge, I decided to break it down into two parts.  Today we are going to discuss *how* to BWB can.

First, let’s look at the equipment you will need.  I have a Norpro 18 Quart Porcelain Enamel Canning Pot.  However, you don’t necessarily need the same pot as I do.  Any very large pot will do.  Next you’ll need some sort of canning starter kit, I bought the Back to Basics 286 5-Piece Home Canning Kit.  This has everything you’ll need:  jar lifter, jar funnel, and magnet pen.  You will also need a ladle.

She gets a lot of use…
Never forget the ladle!
The key to canning is efficiency.  You don’t want your product getting cold, being poured into a warm jar on a cool counter, then bringing that jar up to a boil in your pot.  That will make the jar shatter and all that hard work will be for naught.
So, set up your kitchen with towels and/or place mats.  I find that placemats work great for canning.   Place your empty jars in your canning pot, fill your pot with water until the jars are covered and set the heat on high.  I always bring up my jars to boiling at the same time as the water to reduce chances of breakage.

This takes awhile, so start this first before you start on your product.  You can let the jars boil in there all day long if you want.  It won’t hurt them.  If you do it this way, you won’t have to worry about bringing your jars back up to temperature.   You also want to make sure you boil your jars for 10 minutes to sterilize them before you fill them with your product. However, when you take the jars out to fill them with product, you want to turn the heat off.
Place your lids and rings in a heat proof bowl.  Once the water is at a rolling boil in the canning pot, using your ladle, fill that bowl with the boiling water.  This will soften the rubber on the lids giving you a higher chance of seal when processing.

Once your product is ready to can, pull out the jars and carefully pour out the boiling water from the jars.  Place your jars on a placemat.  For the sake of efficiency and reduction in mess, I always place my product right by my jars.  Place your funnel on your jars and start filling.  Each recipe is different on how much head space you need to give for a proper seal, so be sure to read the recipe carefully before starting the canning process.

These are pictures from my 3 Citrus Marmalade.  We will visit this recipe in the future!
Once you finish filling your jars, wipe the rims with a damp papertowel to remove any gunk from the rims, this helps in ensuring a seal.  Using your magnet pen, place the lids on your jars.


Once all your lids are on, screw on the rings only until they are finger tip tight.  You don’t want to crank these on.

Using your jar lifter, place them in your pot, turn the heat back on and when the water comes up to a rolling boil, thats when you start your process time.  It will take a little while for the water to come back up to a boil, so be patient.  Once the processing time is done, turn off the heat and let the jars sit in the pot for 5 extra minutes.  When that 5 minutes is up, pull out the jars with your jar lifter, let any water fall off the top, and place them on a place mat on your counter.  You should start hearing the “ping” of sealing jars.  After they’ve been cooling on your counter for an hour, you want to check the seal.

The easiest (and coolest) way to check the seal is to remove the rings and lift the jar up by the lid.  If you can pick up the whole jar, it is sealed.  If the seal comes off at all during that lift, it did not seal correctly.  You can either reprocess or place in the fridge and eat it within the next few weeks.

If they sealed, leave them on the counter, undisturbed until they are cool.  I normally let them sit overnight.  Once they are totally cooled, wipe them down so that there is no gunk that can cause sealing failure overtime, label, and store them in a dark cabinet.  One important tip: you do NOT want to store the jars with the rings still ON.  The ring can rust on to the jar and then it’s a royal pain to get off.
And now you know the basics!  Happy Canning!