About uaskigyrl

Urban gardener, amateur cook, lover of life, suffering from a severe case of wanderlust.

Old Houses Are Crazy, Shower Fan Edition

Old houses are crazy!

But first a refresher: My house is 100+ years old. This DIY stuff you find in a 100+ year old home can be the stuff of legends. I’m pretty sure my house was built before indoor plumbing, HVAC, “modern” electricity, etc. So taking that into consideration the after market upgrades have been excellent (not like most houses around here).

For story time purposes: this is what a shower fan looks like. I’ve never actually seen the guts of a shower fan before & I’ve never really thought about a shower fan. Just one of those everyday, 1st world things, one doesn’t really think about… Until you have to.

There’s a housing unit that goes into the ceiling with all the electricity stuff, then the fan, & then a plug for the fan so you don’t electrocute yourself. It’s a basic shower fan. Nothing too fancy.

Anyways, when I moved in my shower fan has always been really loud. I always figured it was loose & tightened the screws every once in awhile. That would work for a bit until the screws loosened up, then I would tighten them. Ad finitum.

Until today. Tomorrow I have resurfacers coming in to resurface the tub & shower area. Since that was going on I figured I might as well take out & replace the fan.

My shower fan

So, the 2 screws come out with some difficulty but that doesn’t really worry me; it’s a shower, they’re probably rusted or something.

Then there’s this nub in the middle. I can’t really see it but my drill doesn’t fit & I’m like, “that can’t be a bolt. It doesn’t make sense”. I shine my flashlight & it definitely looks like a bolt & a weird kind of plastic nut I’ve never seen before.

WTF is going on here?!

So I’m like, “welp, I hope I don’t pull the whole ceiling down on me”, grab the unit & pull down. The unit pulls down pretty easily & it kinda looks like a normal shower fan, & I unplug it.

Original housing unit. Who knows how old this is lol

The housing unit is still in the ceiling but nothing else about the unit looks normal.

I take a closer look. Someone bolted a fan from a newer unit to a fan grate & then installed it in the old housing unit.

It also looks like the bolt was too long, then probably glued that weird plastic nut on it, & cut off the over hang.

I get it. Noone wants to electrocute themselves & they probably did this WAY BEFORE youtube was a thing, but they probably spent more time & effort in rebuilding this special shower fan instead of just properly replacing the entire housing unit anyways 😂😂😂. Like, that is WAY TOO MUCH WORK! Why work this hard when doing it the proper way would have been much easier & Faster?! I just think of this guy working this issue & getting frustrated for a day or two trying to figure this out 😂😂😂

How to Prepare Spot Prawn Caviar

This year I decided to try out Sitka Salmon Share. Sitka Salmon Share is similar to a CSA but it’s for seafood. You buy a share in advance of the season & that helps to support small, independently owned fishing boats in Alaska. Our December box was spot prawns & crab legs.

The spot prawns are loaded with eggs so I wanted to see how hard to would be to prepare caviar. As it turns out it’s not that hard at all.

The process I followed was from Hank Shaw of Hunter Angler Gardner Cook and it’s super simple.

With other roes you will try to remove the membrane completely but spot prawn roe is so small I don’t think that is possible.

Check out my YouTube video on the process below:

Kitchen Review: VacMaster VP95

I attended the International Sous Vide Association Summit in late August and, to my surprise, I won the Grand Prize! The Grand Prize was a VacMaster VP 95.

The VacMaster VP 95 is a chamber sealer. Think of a chamber sealer as a super fancy, hands off Food saver! I’ve really been enjoying it! Check out my video below.

Thank you VacMaster & ISVA for this lovely gift!

Prime Day Review: Waneway Vanity Lights

One of my old vanity lamps kicked the bucket so I decided to peruse what was available on Amazon on Prime Day.  I found these totally cool, modular, self sticky bulbs that turn any mirror into a hollywood glamour vanity mirror & I really like them!

Check out my YouTube video below!

The vanity lights can be found here:

Mixed Seafood Grill with Paprika Chimichurri

About a decade ago I found myself with a long layover in a nondescript airport in a nondescript state.  Since the layover was so long I decided to stop by the USO.  I was reading a couple of cooking magazines and came across a recipe for a mixed seafood grill.  I love a good mixed seafood grill.  Not wanting to destroy the magazine for another soldier I committed as much to the recipe to memory as possible and I’ve been chasing this recipe ever since. The paprika chimichurri is a different way to make a chimichurri but is so delicious and makes the grill. It calls for 3 different paprikas which add layers of flavor on the grilled seafood. I’ve settled on a ratio of the sauce for my family’s taste but it is easy enough to tweak that you can play with it at will. You want to prep everything before you start to grill because once you get the food on the grill everything cooks fast. I offer two “new age” cooking steps in this recipe that are clearly marked: 1. Using edible essential oils and 2. Sous vide octopus. These steps are optional, however, I highly recommend them; if you’ve never “sous-vide-que” octopus it’s a fool proof way of preparing octopus!

Ingredients:

1. 1 baby octopus – per person
2. 1 x 4 oz filet Chilean Sea Bass – per person
3. 6 x 13-15 count Pink Argentinian Shrimp – per person
4. 1 bunch flat leaf parsley
5. 2 lemons plus 1 lemon per cedar plank
6. ½ tsp smoked paprika
7. ½ tsp paprika
8. 1 tsp sweet paprika
9. ¼ cup diced shallot
10. 2 garlic cloves diced
11. 1 pound brussels sprouts
12. French bread
13. ½ cup Chardonnay
14. Olive oil
15. Salt
16. Pepper
17. OPTIONAL: Edible thyme essential oil (i.e Young Living Vitality)
18. OPTIONAL: Edible lemon essential oil (i.e Young Living Vitality)

OPTIONAL Octopus Preparation

The octopus is prepared “sous-vide-que”, the sous vide part of this is completely optional but if you’ve never had sous vide octopus before I highly recommend it. The octopus comes out silky and juicy but toothy. You do not need to blanche the octopus before hand either but the short blanche makes the tentacles curl and give them that nice restaurant visual. Plunging the octopus into ice water immediately after blanching helps stop the skin from slipping off.

1. Bring a large pot of water to boil. Have a second bowl full of ice water. Clean the octopus by pulling out the gills. When water is boiling, using tongs drop the octopus in the boiling water for 30 seconds or until the tentacles curl. Fish out of the boiling water and immediately plunge into the ice water.
2. Once the octopus is cold fish them out of the cold water and dry with paper towels.
3. Slice the head from the tentacles and slice the tentacles into individual pieces.
4. Toss the octopus with olive oil, salt, and pepper.
5. Place octopus into a zipper bag or vacuum seal in a vacuum bag
6. Place bagged octopus into a water bath (if using the zipper bag this is where you would use the displacement method to push the air out of the zipper bag)
7. Sous vide at 175F for 5 hours

OPTIONAL Cedar Plank and Skewer Soak

1. Soak cedar planks and wood skewers in your sink or a large bowl of water.
2. OPTIONAL: Add 3 drops of edible thyme essential oil and 4 drops of edible lemon essential oil to the water.
3. Let cedar planks and wood skewers soak while preparing the rest of the meal
4. Let soak for at least 30 minutes

Brussels Sprouts

1. Slice the bottom of the brussels sprouts, remove the outer leaves, and slice in half from top to bottom.
2. Place brussels spouts in a tinfoil pouch, drizzle with olive oil, salt, pepper, ¼ cup of wine, and juice of half a lemon. Seal pouch by folding the edges and top seam into itself.

Chilean Sea Bass

1. Pat sea bass dry, rub with olive oil, and sprinkle with salt, pepper, and a squeeze of lemon juice

Pink Argentinean Shrimp

1. Clean shrimp by removing the shells and deveining but leaving tails on. Rinse the shrimp and pat dry.
2. Toss shrimp with olive oil, salt, pepper, and a squeeze of lemon juice. Thread shrimp onto skewers

Finishing the Sous Vide Octopus

1. When the sous vide is complete, cut the bag open and drain the octopus into a colander.
2. Pat the octopus dry and toss with olive oil, salt, pepper, and a squeeze of lemon juice.

Octopus – No Sous Vide

1. Clean octopus by pulling out the gills. Rinse the octopus and pat dry.
2. Slice head from the tentacles and slice the tentacles into individual strips.
3. Toss with olive oil, salt, pepper, and a squeeze of lemon juice.

Grilled Bread

1. Slice French bread and brush with olive oil.

Paprika Chimichurri

1. Bring a small sauté pan to medium high heat.
2. Add a tablespoon of olive oil and sauté shallot until golden and soft. Add garlic and sauté until fragrant.
3. Add a tsp more of olive oil and add the paprika. Sauté paprika until nutty and fragrant.
4. Deglaze pan with ¼ cup of wine and pour into a bowl
5. Add salt and pepper and lemon juice from half a lemon.
6. While whisking add a half cup of olive oil in a steady stream until emulsified
7. Strip parsley leaves off of stalks and roughly chop the parsley leaves.
8. Stir in parsley leaves to the paprika and olive oil mixture
9. Taste and balance with more lemon juice, salt, and/or pepper.

Grill It!

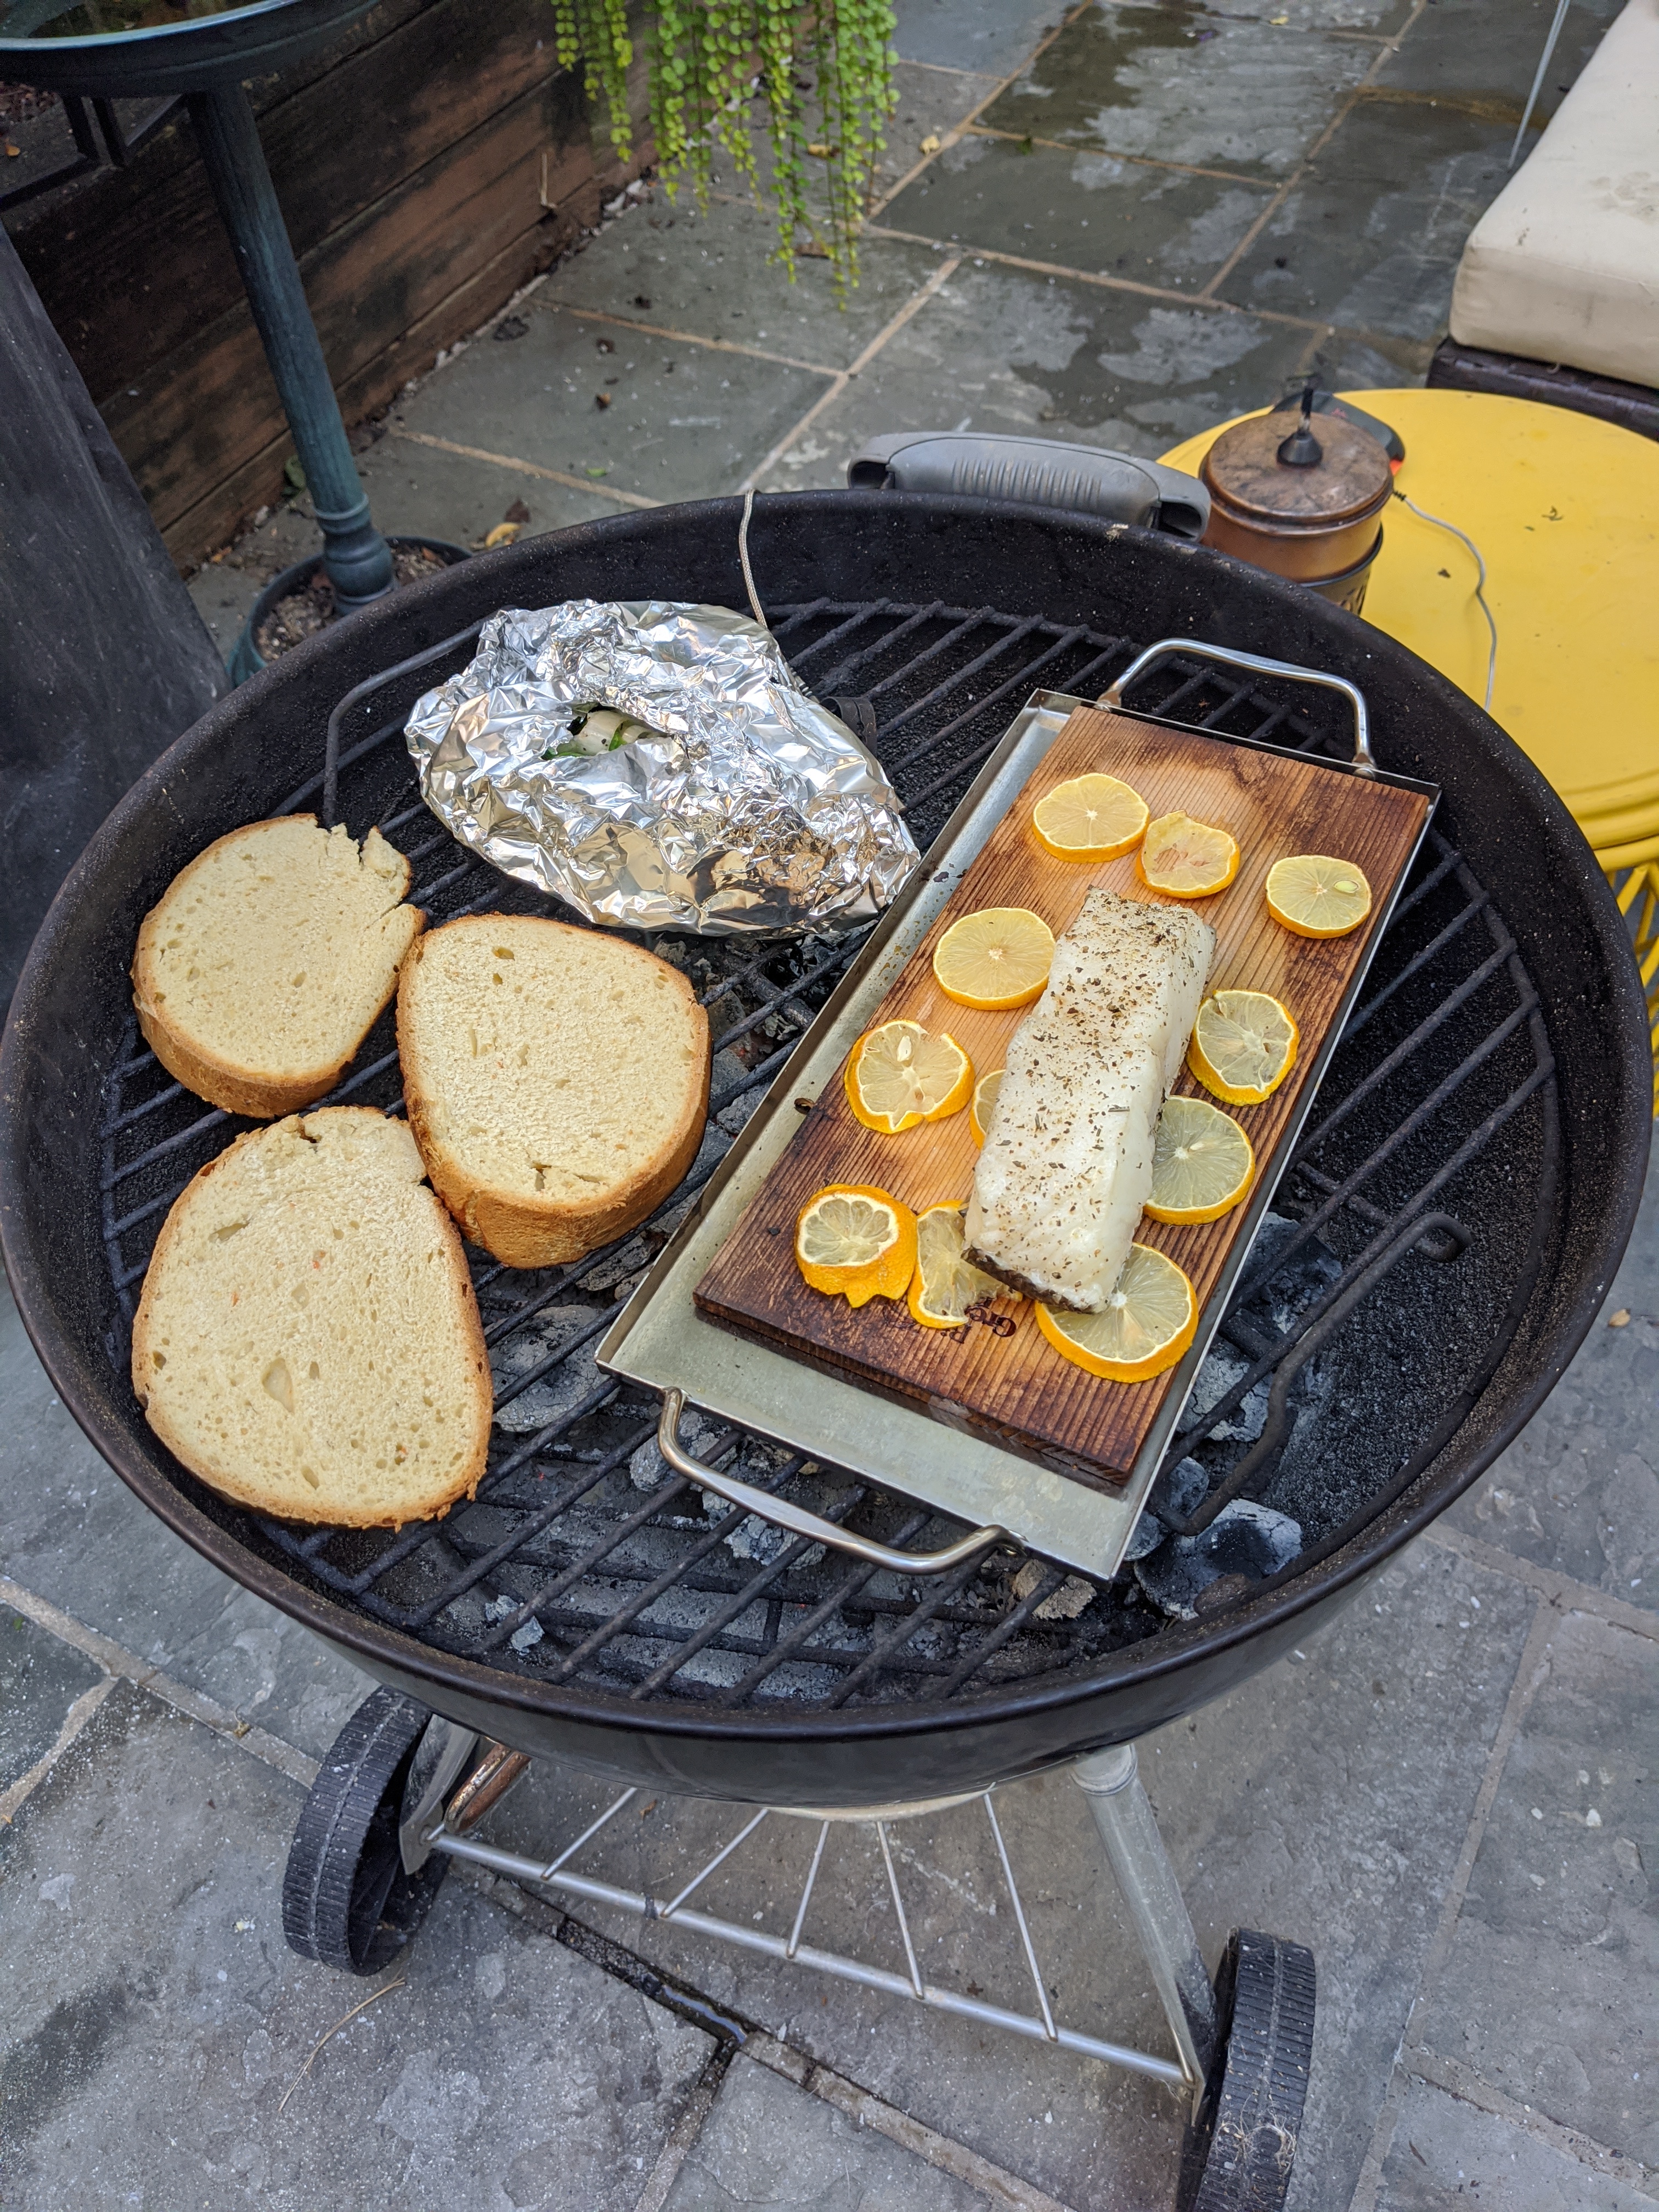
You will add the brussels sprouts to the grill first since they take the longest to cook. The next longest time is the Chilean Sea Bass, then the shrimp, then the bread, and then the octopus.

1. Fire up your grill to medium high.
2. Add brussels sprouts pouch to the grill, cover the grill, and let grill for 30 minutes
3. After 30 minutes, check the sprouts. Once fork tender start grilling the seafood.
4. Slice one lemon per cedar plank and place lemon slices on the cedar plank. Place cedar plank on the grill.
5. Place Chilean sea bass, skin side down, on top of the lemon adorned cedar plank.
6. Let the Sea Bass grill for about 5 minutes and add the shrimp to the grill
7. Let the shrimp grill for about 5 minutes, turn the shrimp to grill the opposite side.
8. Once you turn the shrimp, add the French bread to the grill.
9. Place the octopus on the lemon adorned cedar plank. The octopus will take around 3 minutes to cook. (if you sous vide the octopus remember that it is already cooked, you are just finishing it on the grill; if you did not sous vide the octopus it will take 6 minutes)
10. Pull of pieces of the seafood grill as they are finishing up.
11. The sea bass is ready to take off the grill when it reaches an internal temperature of 135F or flakes easily with a fork.
12. The shrimp is ready when it’s bright pink and has a slight C-curve.
13. Pull the brussels sprouts off the grill at the very end.

Plating

Plate the brussels sprouts on the plate and place the sea bass, shrimp, and octopus around the brussels sprouts. Drizzle the seafood with paprika chimichurri, garnish with grilled lemons, and serve remaining sauce on the side. Use bread to sop up any juices.

How to Can with Frozen Tomatoes

Hi all!

I’m back with another vlog! I wanted to make a vlog about how I can tomatoes. Since I had tomatoes in my freezer that needed to be preserved for easier use I thought it would be a good time for a video!

Enjoy!

Sustainable Home Products, Part 2

In this video I talked about other ways I am trying to reduced waste & what I thought of them.

Bamboo Reusable Paper towels: https://smile.amazon.com/dp/B07L38LXDD/ref=cm_sw_r_cp_apa_i_fVQ9Eb5VMGB2T

Reusable bamboo cotton rounds: https://smile.amazon.com/dp/B07D5XQRFW/ref=cm_sw_r_cp_apa_i_RXQ9Eb073WFMD

Bamboo Toilet Paper: https://smile.amazon.com/dp/B00YGIW2B2/ref=cm_sw_r_cp_apa_i_7VQ9Eb6KF6Y8B

Loop: https://loopstore.com/

TerraCycle: https://www.terracycle.com/en-US/

The Lie of Recycling & Sustainable Oral Products

Hi All,

I’ve been researching the efficiency of recycling for awhile now & if it’s really doing what it’s supposed to do. From there I came across sustainable self care products. Today I talk about Sustainable shampoo, deodorants, & oral products.

By HumanKind: https://byhumankind.com/

Myro: https://www.mymyro.com/

Bite: https://bitetoothpastebits.com/

Recycling: https://www.nytimes.com/2018/05/29/climate/recycling-landfills-plastic-papers.html

Microplastics in Antarctica: https://www.theguardian.com/world/2020/apr/22/microplastics-found-for-first-time-in-antarctic-ice-where-krill-source-food

I don’t think we will ever be able to rid ourselves of one use plastics but the hope is that we can significantly reduce our use of one use plastics.

Zeelool Haul

Hello All! I made another youtube video! Check it out below!

The glasses that I bought were:

Sydney: https://m.zeelool.com/fm0125-01.html

Hilary: https://m.zeelool.com/fx0206-01.html

Maria:. https://m.zeelool.com/zoa01451-03.html

Evelyn: https://m.zeelool.com/rm0545-01.html

The round ones seen to not be available anymore.

You can get a discount on your first order using the following link: https://m.zeelool.com/?mw_reward=f5d1

Bar Top: Limequat Daiquiri

My first recipe with the limequats was a limequat daiquiri. A traditional daiquiri made correctly is not that overly sweet drink that you typically get at a bar, it’s actually a very strong drink in the ratio of 2:1:1: 2 parts rum, 1 part lime juice, 1 part simple syrup.

I don’t make simple syrup to put in my mixed drinks for my home bar as I just don’t use it that often so in this drink I muddled powdered sugar with a thinly sliced limequat, muddled, and added a bit of water. Then I added the rum and the limequat juice. See my video below!