Orange Marinated Red Pepper

I love bell peppers but I can’t eat them raw so I don’t buy them often because of that.  Which is a shame, really, because bell peppers add a lot of flavor to salads and can be a great snack.

I read Marc Matsumoto’s blog “No Recipes” (and you should too!  His recipes are amazing!) and one day I received a post about “Grapefruit Pickled Peppers” and was very intrigued.  I read through the recipe and I had to try the method immediately.  This method makes a very crisp, marinated pepper that you can eat right out of the jar.  Marinating the peppers in a citrus juice “cooks” the peppers as the acid will break down the fibers a little bit. I have been eating these peppers almost everyday in an afternoon snack salad.  I hesitate to call these peppers “pickles” because technically they are not pickles, so I call them “marinated” peppers.

In Marc’s recipe, he uses grapefruit juice but I had some orange juice from making the Carne Asada, so I stuck to his method but used orange juice instead.  I also didn’t have any fresh cilantro on hand.  Knowing that cilantro has a peppery flavor, I used dried celery and peppercorn that I had.  I also didn’t have lemon juice on hand so I used a dried lemon rind with the pepper.

Orange Marinated Red Pepper

Adapted from Pickled Peppers Recipe of No Recipes

Yield:  1 quart

2 cups Orange Juice
1 teaspoon dried celery
2 Tablespoon kosher salt
1 teaspoon peppercorn
1 dried lemon rind
1 bay leaf
2 red bell pepper

  1. In a large bowl combine orange juice and kosher salt
  2. In a quart jar add the dried celery and peppercorn.
  3. Slice the pepper and stuff it in the quart jar.  Stuff the bay leaf and dried lemon rind in with the peppers.  Pour the orange juice over the peppers.  Cover and refrigerate.  Use within 2 weeks.

Salt & Pepper Preserved Kumquats

Since salt preserved lemons and oranges do so well in my kitchen, I decided to make salt preserved kumquats with the 5 pounds I had recieved.  I like kumquats as a snack but I can only eat 4 or 5 at a time before I can’t eat anymore and I still had a whole bowl to go.

Since kumquats are so sour, I wanted to mellow them out a bit and make them more savory.  I made about a 1:3 ratio of pepper:kosher salt and used this to salt preserve the kumquats.

First you want to slice off the blossom end of the kumquat and then slice down from the blossom end to the bottom but not all the way through…you want to keep the kumquat intact.  If it’s a big kumquat you want to then make another slice perpendicular to the first slice, all the way but again keeping the kumquat in tact.  Stuff the salt and pepper mixture into the kumquat and place the kumquat in a sterile quart jar.

Make sure you have no cuts on your fingers.  OUCH!
Repeat with each kumquat until you haev filled the quart jar, squishing the kumquats gently down as you go.  Once the kumquats are packed in the jar, place the lid on and let the jar sit for 24 hours.  After 24 hours, fill the quart jar with fresh lemon juice and tuck a bay leaf in the jar.  Let the jar sit for 2 weeks on your counter, flipping the jar every other day or so.  Add more lemon juice to cover the kumquats if it is needed.  After the 2 weeks, place the jar in the fridge.  This will last the same amount of time as preserved lemons and oranges. 

 
I’m really excited about these little guys.  I think the salt and pepper are going to play really well with the sweetness of the rind and the sourness of the pulp.  I can’t wait to start using them in recipes.
 
I’m always intrigued by something different!


Preserved Oranges

Remember when we did Preserved Lemons?  Well, you can do the same thing with oranges (and limes and gragefruit, basically any citrus)!  I don’t use preserved oranges as much as preserved lemons but they are great for a well stocked home bar.  You know all those annoying drink recipes that call for a “twist of orange” and you’re like, “Damn it!  I’m not going to buy an orange just for a twist!”  I just replace that twist with a sliver of preserve orange rind!  It gives your drink the same oomph as a fresh twist and you don’t have to do without; plus, you can eat the rind!


Preserved Oranges

Ingredients

4 Oranges
4 T Kosher Salt

Directions

  1. Slice 4 oranges into eights – maybe smaller depending on how big you want your slices to be and how big your oranges are
  2. In a sterile quart jar, sprinkle about a half tablespoon (I use one generous pinch) into the bottomof the jar.  Lay around 6-8 slices into the jar and push them down until they start to express their juices.
  3. Sprinkle half a tablespoon over the layer of orange slices
  4. Repeat layering oranges and kosher salt until you fill the quart jar up to the neck.
  5. Let oranges sit on your counter for 24 hours.  After 24 hours, fill the quart with fresh orange juice, ensuring that you cover the oranges.
  6. Let the oranges sit for a week.
  7. Label and place in the fridge.  After a week in the fridge, check your oranges.  If they have expanded add more juice to cover.  They will keep about a year in the fridge.

Preserved Lemons

If you’ve never made preserved lemons before, you are completely missing out.  I got interested in the idea of preserved lemons after getting tired of forgotten fresh lemons drying out and going bad.  It’s always frustrating to throw out wasted produce.  Especially lemons.  When I received my first ever preserving book, Canning for a New Generation, one of the first recipes I tried was “Preserved Lemons”.  Let me tell you:  Preserved Lemons have changed my life.  I can now order lemons in bulk when they are seasonally at their best and enjoy the taste of lemons all year long!  As much cooking – and*ahemdrinkingahem* – as I do, one quart of preserved lemons lasts me about a year.  Preserved Lemons are pickled lemons that have been pickled in their juices and salt.  You can use the pulp of the preserved lemons in recipes, however, keep in mind that it is salty and briny.  The magic of the preserved lemon is in the rind.  The rind becomes a beautiful, soft, chewy pickle that is palatable and goes a long way in recipes.  I know it seems counterintuitive to eat citrus rind but trust me on this.  In the middle of summer when lemons are not at their best – or when you just don’t want to go to the grocery store – I have substituted finely chopped preserved lemon rind in any recipe that calls for lemon zest.  I have whirred up a few slices in the blender and used the paste in recipes that call for lemon juice.  There’s a great lemon vinaigrette and a great Preserved Lemon Roasted Chicken recipes that I use with these lemons (those recipes to follow in the future).  Pretty soon, you will find that your refrigerator feels empty without a jar within reach.
 

First you want to grab about 4 lemons (you may need more, you may need less.  It all depends on the size of your lemons) with limited, to no, blemishes on the skin – remember, the pickled rind is what we will use in the majority of recipes.  4 good sized lemons will generally fill one quart jar.  Ensure that you clean and scrub your lemons well and thoroughly dry them.  Next, slice them into eights (or smaller if you have really big lemons).
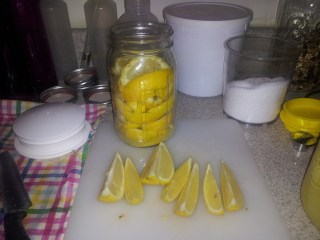
 
 
Grab one sterile quart jar; I find that wide mouth quart jars are easier to make preserved citrus in because you can get your hand in there to squish the citrus down.  However, regular mouth jars are cheaper and you can use the end of a wooden spoon to mush them down.  Take a pinch full of kosher salt and sprinkle it into the bottom of your jar.   Layer your first 4 to 6 slices of lemons into the jar, squish them down to release some of their juices, take a generous pinch of kosher salt and spinkle on top of the layer.  Keep repeating until you have layered your lemon slices and kosher salt all the way to the neck of the jar (You want to leave some space for the lemons to expand as they will absorb some of their juices after they have expressed them.)  Screw on the lid and ring and let the lemons sit on your kitchen counter, or kitchen window sill, for 24 hours.  The lemons should express some of their juices.  After 24 hours, you will add fresh lemon juice to cover the lemon slices.  Keep your lemons on your counter/sill for a week.  After a week, place them in the fridge.  After about a week in the fridge, check your lemons and if they have expanded, you will need to add more lemon juice to cover.  They will keep for about a year (although I have kept them for longer).
 
 
Preserved Lemons

Ingredients

4 Lemons
4 T Kosher Salt

Directions

1.  Slice 4 lemons into eights (or smaller if you have really big lemons)

2.  In a sterile quart jar, sprinkle about a half tablespoon (I use one generous pinch) into the bottom of the jar.  Lay around 6-8 slices into the jar and push them down until they start to express their juices.

3.  Sprinkle half tablespoon over the layer of lemons slices

4.  Repeat layering lemons and kosher salt until you fill the quart jar up to the neck. 

5.  Let the lemons sit on your counter for 24 hours.  After 24 hours, fill the quart jar with fresh lemon juice, ensuring that you cover the lemons.

6.  Let the lemons sit for a week.

7.  Label and place in the fridge.  After a week in the fridge, check your lemons.  If they have expanded, add more lemon juice to cover the lemons.  They will keep for about a year in the fridge.